
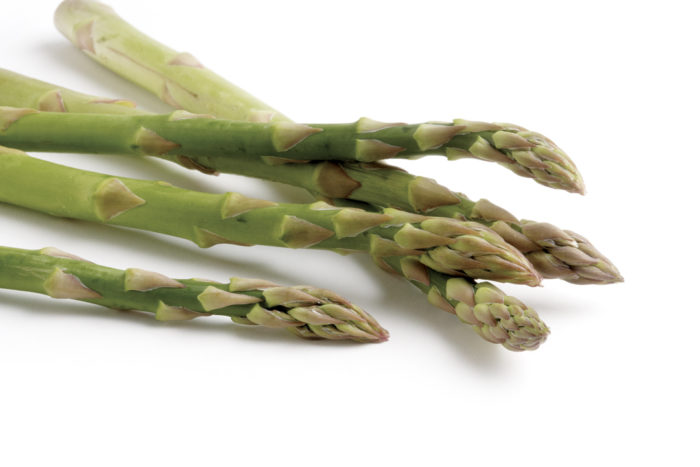
As a perennial, asparagus requires more up-front investment than any other vegetable. But the long-term payoff is that, once established, an asparagus bed can, with minimal maintenance, produce for 15 years or more. Its harvesting window is short, but asparagus freezes so well that the ancient Romans deployed runners to bring spears from the Tiber Valley up to the Alps, to hold them in glaciers there until the Feast of Epicurus. Asparagus is not just delicious; it is also rich in fiber, B vitamins, antioxidants, vitamin K, and folates—the latter of which are especially helpful in brain development and may provide some protection against Alzheimer’s disease.
My current asparagus patch has been going strong for six years now, and I am happily picking asparagus in amounts exceeding the reported expected yields—with scandalously minimal maintenance. Here are some tips and tricks that I’ve learned along the way that can help make your own asparagus patch a success.
Get the soil right from the beginning
A well-prepared asparagus bed will be in your life for at least 15 years—longer than most cars, careers, and marriages (statistically speaking), so it makes sense to do it right. Locate your patch in as well drained and sunny a place as possible; asparagus doesn’t like wet feet. Get a soil test to find out the pH of your soil and other basic attributes of your soil’s health, and amend your soil accordingly. Pay particular attention to getting the pH adjusted to near 7.0, and increase your soil’s organic matter as much as possible. If possible, do all this a year ahead of planting time. Till the bed to smother any weeds, or if using a fork, loosen the soil and remove any roots you see. Once you plant your asparagus, it will be difficult to remove weeds without damaging the asparagus roots because they grow so close to the surface. The further ahead of time you do this, the more effectively you can clear the bed of any weeds that might lie in wait. Consider growing a cover crop or two (such as buckwheat in midsummer, and oats and peas in early fall) the season beforehand. A cover crop will help suppress weeds, build organic matter, and fix nitrogen into your soil all at once. Even if you don’t use a cover crop, keep the patch weed-free, at the very least, during this time.
Consider your climate when choosing plants
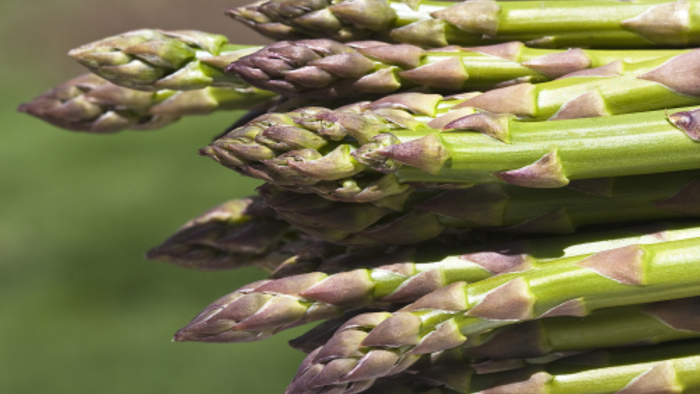
Asparagus can be grown from seed or from one-, two-, or even three-year-old crowns. I recommend first-year crowns; they give you a year’s jump on the harvest compared to seeded asparagus, and they cost far less and are more vigorous than older crowns. Although open-pollinated heirlooms, such as ‘Mary Washington’, are still knocking about, the variety I chose to plant when I started my bed was one of the modern hybrids. I was swayed by the greater productivity of the hybrids (yielding at least twice as much as the heirlooms) and their greater potential for disease resistance. I am particularly concerned about fusarium rot—a fungal pathogen that almost ruined my home state’s asparagus industry back in the 1950s and that still resides in the soil here. I chose ‘Jersey Supreme’, which is resistant to fusarium rot. When choosing which variety to plant, you might also want to consider your latitude and your microclimate. Almost every year, I’ve lost my first wave of asparagus spears to frost damage. ‘Jersey Supreme’ is supposed to thrive in my zone, but my farm lies low in a steep valley—the short straw when it comes to spring frosts. If I expand my plantings in the future, I might try ‘Millennium’ or another hybrid from Canada. If, on the other hand, I retire to North Carolina, where the early summer heat would be my enemy, I’d go for an early-emerging variety, like ‘Apollo’ or ‘UC 157’.
Prepare the furrow, and amend the soil
Once you’re ready to plant, it’s time to break ground. Dig a trench about a foot wide and 8 to 12 inches deep—about as wide and deep as the head of your shovel (stay on the shallower side of that range if your soil is heavy or clay based). If adding lime, bonemeal, or other sources of phosphate, you can do so at the bottom of the trench. Hold off on adding compost until after you’ve planted the crowns and they have grown in a bit. Too much compost can result in waterlogged soil, which will rot the crowns. How big a patch should you prepare? That depends on how much asparagus you want. Plant five crowns per family member, twice that much if you want extra to put by. Crowns need at least 2 feet on either side within the row.
Place the crowns, and partially cover them with soil
Don’t plant your crowns too early in spring. They won’t like being subjected to a frost during their settling-in period. Your nursery will know what planting dates to recommend for your area. Plant the crowns as soon after arrival as possible. Do not soak them before planting. A healthy crown will have upward of 30 fibrous roots, resembling rat tails, up to a foot long. I’ve found that the crowns have a tendency to fall over on their side in the trench unless you mound up the soil underneath them a bit. The roots can then spread slightly down and into the trench, and the crowns themselves will stay upright. Once positioned, cover the plant with a 2- to 3-inch-deep layer of the soil you took out of the furrow. Plant your next crown about 2 feet away, and continue down the line. Water in the crowns, and check back in a few days.
Over the next six weeks or so, keep the trench well watered and watch for thin spears to emerge. As they do, add 2 to 3 inches at a time of a blend of soil and well-aged compost, never burying the shoots completely. Use anywhere from 25 percent compost for relatively rich soils up to (at most) 50 percent compost for poor soils. If the spring rains don’t amount to at least an inch per week, remember to water; your new patch will benefit, in fact, from an inch of water weekly through the end of August. As the spears open up and become ferny fronds, make a habit of walking the patch every few days to scout for pests. Keep an eye out, in particular, for the asparagus beetle (sidebar, above). Make a habit, too, of pulling any weeds you see.
At the end of the first year—especially if you saw beetles earlier—clip the dried-out fern stalks and remove them because asparagus beetles overwinter inside the stalks. Make sure to wait until the ferns are completely dried out; as long as there’s any green to them, the ferns are feeding the crowns.
Start harvesting just a few spears in the second year
In the second spring, you can begin to reap some of the rewards. Once the first spear is sizable enough, you can take all emerging spears for the next two weeks. If you take for too long, however, you are robbing the crowns of a critical level of fernery. The ferns are where photosynthesis occurs—and photosynthesis feeds the crowns, which, in turn, determines how well they will produce spears in the future. In the third spring, you can bump up your harvest window to four weeks. In the fourth and subsequent springs, you can pick for six to eight weeks. Within that time frame, if the emerging spears get noticeably smaller all at once, that’s a sign that you should cease picking. One rule is that you should stop harvesting once the largest spear is less than a ½ inch in diameter, but don’t go beyond eight weeks. If, in any year, the spears don’t seem to be sizing up, it might be that you overharvested in the previous year. You’ll find that, in the early days of your harvest window, you can get by with harvesting every two to three days. As things warm up, though, the spears can put on as much as 12 inches a day, so it’s best to make a morning habit of it.
Some folks like to harvest by cutting the stalks, others by snapping off the stalks with their hands. I favor snapping—it’s easier and faster than cutting, and what breaks off in my hand is tender enough to eat, so I don’t have to trim it in the kitchen. Cutting the spear at or below the ground surface risks damaging adjacent not-yet-emerged spears or giving soil-borne pathogens easy access to enter the resulting wound.
Keep the patch productive and healthy
Once your patch gets a few years old, you likely won’t need to irrigate at all. At two years old, the roots are deep enough to get the water they need from the soil. (Rumor has it that asparagus roots can reach 4 feet deep into the soil.) I fertilize once a year in spring. In early April, I send a soil sample of the patch to a soil lab, and I receive recommendations on how much nitrogen, phosphorus, potassium, and various micronutrients to add. The advice varies widely from year to year. This makes me reluctant to rely on blanket recommendations as to a general fertilizing scheme.
Asparagus is the most rewarding and least labor-intensive crop I grow. It was worth every moment of effort to start my patch off on the right foot.
Megan Haney practices community-supported agriculture at Marble Valley Farm in Kent, Connecticut.


Comments
Log in or create an account to post a comment.
Sign up Log in